Saturday, November 8, 2014

Spider and the Fly

Spider and the Fly


The Spider and the Fly went well with 15 students K-5th grades. The interesting aspect of this program was the archaic language of the 1899 poem by Mary Howitt, The Spider and the Fly. A few of the students were frightened by the poem so afterwards I helped them shake off all the creepiness by simply having them shake their hands in the air while saying "Shake it off!" in silly voices. Now it's time for silly story!  Hi Fly Guy by Ted Arnold was the natural choice. I ended our hour up with Thelonius Monster's sky-high fly pie: a revolting rhyme by Judy Sierra while the students ate homemade Shoo- Fly pie. They loved it and I handed out many recipes. 


The Crafts


I demonstrated how to draw a spider web at the beginning of the program. Before I read the poem I went over some “old” vocabulary words that are in the poem while they were drawing spider webs on their paper plates. I was surprised with their curiosity and interest to learn “old words” but it really helped their understanding of the cautionary poem as I read it. Then we made a spider and fly using black grapes, raisins and spaghetti. The wings on the fly are flatten golden raisins. 

 Fly Guy


Fly Guy's  is made from brown modeling clay. I attached the basic clay shape to small wooden dowels before the program. Each child was given two Mentos for the eyes and wings cut from plastic cups, uncooked spaghetti and a ball of clay for the nose. They drew the pupils with a Sharpie marker. 


A few props and my Shoo Fly pie. The motivation for this program were to use up and give away a surplus of raisins we had in our pantry. Mission accomplished. 


Friday, September 19, 2014

The Story of Salt


This September starts a new season with Creating with Books and I decided to recycle my first program presented in February of 2007 , Salt: What's Shaking?
 I had 15 students mostly k-3 grades and a few 5th graders.
A good icebreaker is to introduce figure of speech that refer to salt like - salt of the earth. There are many sites that give reference to this and facts about salt. 
I read experts from The Story of Salt by Mark Kurlansky. It is a very readable informative book on salt's value to all living beings, the impact salt had on historic civilization including settlements, revolution and war. We talked about salt as we know it today. We tasted crackers with and without salt.
I read 

We made mazes with salt and later made salt paintings.


The salt paintings originally were to be salt sprinkled on wet watercolor creating pattern bursts. The day before the program I experimented and it flopped, my husband is an artist and we exprerimented at home and found that you need to use high quality watercolor with actual dyes in the pigment.  I moved to plan B, and that was to draw shapes on the watercolor paper with glue then sprinkle the shapes with salt, shaking off th excess and letting them dry. The kids then painted the pictures with watercolor paint and were happy to see how the salt asorbed the paint. 


Tuesday, April 29, 2014

What are you hungry for?

What are you hungry for? Feed Your Tummy and your Heart by Emme

Eating is something we all do, but in this program we explored our intrinsic hungers as well as how we go about satisfying them. In this program we discussed emotional and creative"food". The story brought us the treat of an ice cream cone and comfort of a cozy hug;  a hot dog and a silly smile at lunch; crunchy corn on the cob and a piggy back ride; the disappointment of striking out at bat and a reassuring pat from the coach not to mention the pizza party that cheers you up at the end. The story ties together these experiences and more in the daily life of a child. 

I read the story Fat Cat ~ A Danish Folktale, retold by Margaret Reid MacDonald


The illustrations in this book are fantastic and I will be retelling it next month at 
Storyvine, a story telling festival for students kindergarten through second grade. It is a
cumulative tale about a cat who "may be fat, but he's a hungry, hungry cat"
After he gobbles up everyone he encounters, including a wash woman, soldiers and a king riding an elephant, the cat "slip, slop, slurp" gobbles up his friend mouse too. The story has a humorous ending and reminds us that our hungers are not always rewarded by eating. 


Plate Painting Craft

I ordered 24 white dinner plates from the Dollar Tree and picked them up at the store so 
the shipping was free. The cost was $24.00 + tax. I highly recommend using their site. I know that I will use it again because it is such a time and money saver. I researched Sharpie plate painting and found that you could bake the plates for 20 minutes at 300 degrees and the marker in would set although the colors will become darker. If the plates are not baked the design will rub off in the wash. I did not bake the plates and let the children know that they were for decoration only. I did find that rubbing alcohol will remove the marker as well and we were able to erase mistakes during the craft. Here are the results. 


I demonstrated drawing techniques. Outlining lighter shades help them pop, and working from light to dark allows you to layer colors. We looked plates and pictures of plates for design inspiration. There was a marker buffet with the display. I allowed the children to pick 3 colored Sharpies and one black or silver marker. I had several circular shapes for them to trace as well. 


MY FAT CAT


AND ROBERTO'S FAT CAT. 

This will be the last Creating with Books post for this season. In the library we break from programing in May and after Summer Reading  I will post again in September.
If you like my blog or have questions please take the time to comment, thanks. 


Tuesday, April 1, 2014

I HEART YOU !

I HEART YOU!

This program was planned for February 13th but winter gave us snow and ice and the library was closed. Southerners love our rare snow days. I presented the program in March and the kids enjoyed the stories and craft. I displayed twelve books on LOVE and 
 I handed each child a  small wooden heart to place by the book they loved best.
 Can you judge a book by it's cover?  The winners were: 

Zombie in love/ Kelly DiPucchio- 4

Paul Bunyan's Sweetheart/ Marybeth Lorbiecki- 4

Lovey and Dovey/Melissa Walker -3

Pearl Barley and Charlie Parsley/ Aaron Blabey- 2

Woof: a love Story/Sarah Weeks- 1

Falling for Rapunzel/Leah Wilcox- 1


The Craft


I used a template to trace hearts on medium weight cardboard.
I cut them out and notched them and  I  balled some lively colored yarn spread them out on a table.
Each child had a two hearts one 4 1/2" and 3". They wrapped the hearts until the cardboard was covered and they were puffy. I had a 15 minute cartoon planned for them to watch while they had a snack but they were totally into wrapping their hearts. They even ignored the snacks and I had to bring them to them at the last 5 minutes of the program.
 I played B is for Bob produced by Zizzy Marley during the craft so we were all peaced out.
 It was a nice and fuzzy time. 


Monday, March 10, 2014

A is for Apple

Too many apples!!!!

What do you do when you have a surplus of apples? 
You share them, create with them and eat them. We did all three in January.  
I warmed them up with the simply wonderful book. 
Orange Pear Apple Bear by Emily Gravett


I use this book for my preschool storytimes. The school aged children oohed and ahhed
over Emily's smart whimsy.
Her beautiful watercolors sparked creative comments. 

The book that inspired my theme is a older level picture book about the artist Cezanne and a summer his young son Paul visited him in his little home the mountains of France. 
 Cezanne and the Apple Boy
by Laurence Anholt


The children drew an apple from still life. I cut watercolor paper into 8x8 inches.
They had a palette of crayons, oil pastels and watercolor to work with.
I cut the pastels into 1/2" pieces to divide among the tables.


My instructions included a demonstration. I drew the apple with crayon and colored it in, then I drew
the surface that the apple was on so the apple wasn't floating in the air - the horizon.
Ohhh! They loved the that! Then I highlighted with oil pastel over the crayon. I then outlined the apple in black, because Cezanne used that technique. I watercolored the background wall but not the table. I was able to show them that the oil in the crayon provided a barrier, or a wall to control the paint.
Note: I wanted the apples to shine so I washed them in warm water and dried them. BIG mistake. The apples became cloudy with a white film. I had my co-worker Martha search for a solution while I continued to set up. Soaking in vinegar and cold water helped, a good bit of elbow grease was needed. The wax coating on the apples sets in with warm water.

Here are their Still Lifes!


We all shared a feast of apples, cheddar cheese and apple pie. 
All of the apples were eaten!


Monday, December 30, 2013

ROCKS ROCK!

Rocks Rock!


I brought in rocks for the students to stack while waiting for everyone to arrive.


For a  fun introduction we read the amusing alphabet book If Rocks Could Sing by Leslie McGuirk. 


Show and Tell

I encouraged the children to bring in a special rock and share it with the group.
We had five children share their treasures. 


The Craft

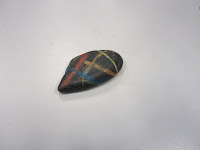
We colored river rocks with Prismacolor pencils. I had some examples to show them. 

 
They enjoyed the craft but the end product was disappointing for me.  It would be a better craft for older students, but mine were mostly younger elementary. Allow at least 15 minutes for this activity. It can also be completed at home with regular colored pencils. 


The Story

I read the classic version of Stone Soup  by Marcia Brown.


Candy Rocks!

I found a wonderful post featuring these realistic looking candy rocks made from white candy bark and chocolate flavored cookies. I doubled the recipe and made them them the night before. Day of, I cut the "fudge" into bars and  put them on paper plates 
and from there they easily became rocks. Here's the link for the recipe. 


These turned out great and they enjoyed snacking on them while we watched Scholastic's film 
of Sylvester and the Magic Pebble by William Steig.


PS...

I found this cool idea and I will use it for a future rock program. They can decorate the cardboard egg carton and I will acquire some rocks to get them started. Plus they can put their candy rocks in there.


Wednesday, October 30, 2013

Talkin' Trees


Our Tree Named Steve

by Alan Zweibel

Our Tree Named Steve is a heartwarming story, told in flashback by a father to his 
children, about a tree and how that tree became a beloved 
family member. It is illustrated by David Catrow.  I wanted to do a fall-ish program
but our beautiful Charlotte NC trees haven't begun to change their colors yet.
 So, I opted for Steve.  If you haven't read it,  read it today; 
I'm sure that you will want to share it with others. 

Old Elm Speaks Tree Poems
by Kristine O'Connell George
Sky Tree: Seeing Science Through Art by Thomas Locker


Talking Sticks

In Native American tradition, talking sticks were used to keep order and respect in tribal meetings and gatherings, but their use was also extended to storytelling circles and teaching children. I was just looking for a craft that I could use sticks for. But I got so much more out of the experience, and so did the children. We sat in a circle and I passed the talking stick around giving each child an opportunity to speak. Being the elder, I began the conversation asking them what kind of program they would like to have with Creating with Books? Most of them passed the stick on but we had a few that spoke up.
 Next month I will be doing a program on rocks thanks to one of the students.


The Craft

I brought in some cut "sticks" from an overgrown shrub we had trimmed. My husband helped me cut, sand and clean the sticks. What a sweetie. I had made a talking stick prior to the program testing out different techniques. Prime the sticks in tempura paint (not acrylic) and use permanent makers for the design. I put out different colors of  Sharpie permanent markers on the paper covered work tables. To protect their clothes I had large tee-shirts for cover ups. The primed sticks, yarn and feathers were at a buffet table where my co-worker Noelle manned the hot glue gun that was used to secure the string yarn and feathers. I played instrumental music in the background while the six to ten years old created.


My Talking Stick


 After the craft they enjoyed a healthy snack of  broccoli trees, pretzel sticks and ranch dip. Yum.